2-Point Start Biometrics: Video Analysis & Coaching Guide

This guide matches the Launch app's 2-Point Distance Start profile. Use it to film clean clips, read the report card correctly, and turn the biggest leaks into the next coaching priorities.

AlphaPeak logo

Standing 2-point distance start analysis for projection, posture, and first-step efficiency.

In the Launch app, choose 2-pt Start. This analysis is built for standing 2-point distance starts and scores set posture, double-leg push timing, takeoff, and first contact so you can coach the opening 2-3 steps with more precision.

Video recording guidelines for 2-point distance start analysis

Part 1: Record The 2-Point Start

Clean side-view footage is what makes the angles and event times usable.

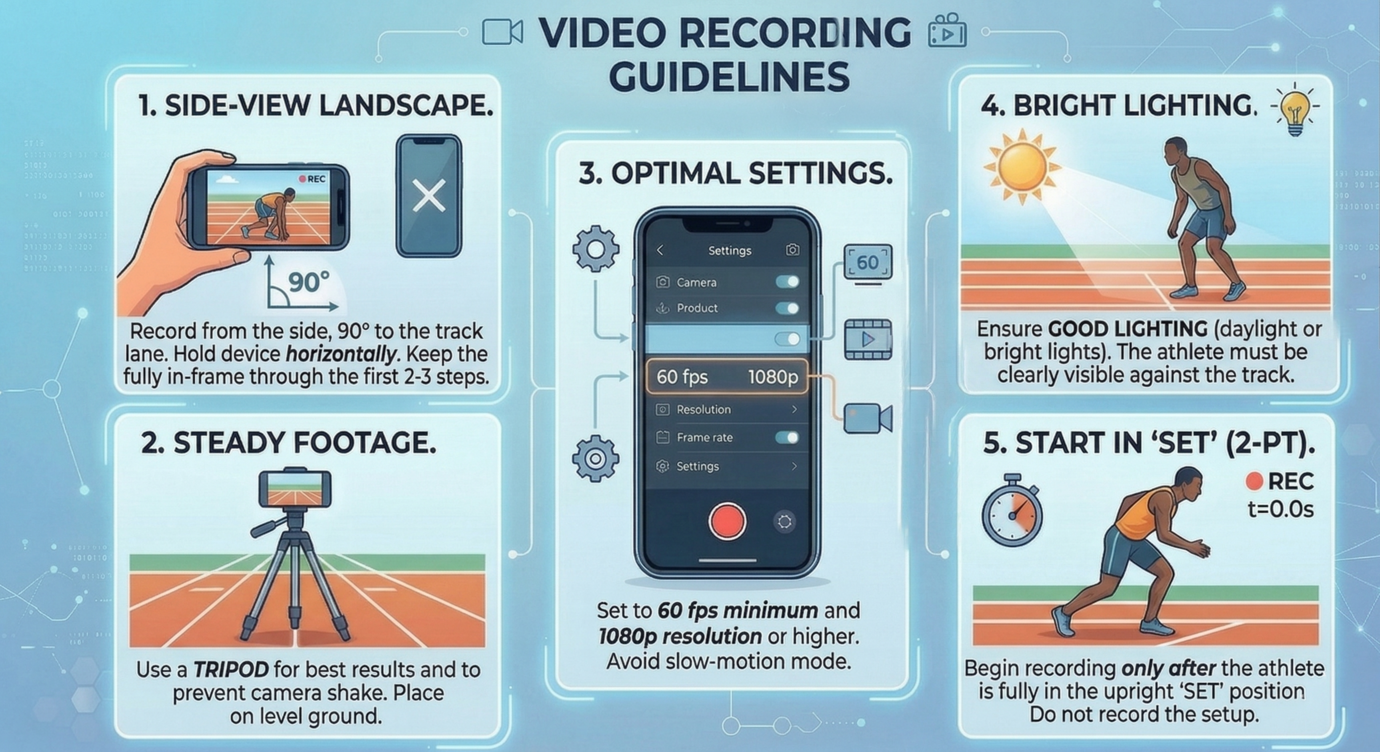
Best results come from a clean side-view 2-point distance start with the full body visible through the first 2-3 steps. Keep the setup simple and repeatable.

  • 1. Side-view, landscape: place the phone at 90 degrees to the lane, hold it horizontally, and keep the athlete head-to-toe in frame.
  • 2. Full body through first contact: do not crop the feet, hands, or torso during takeoff or the first 2-3 steps.
  • 3. Camera settings: 60 fps is recommended at 1080p or better. Go higher only if the clip stays bright and sharp.
  • 4. Stable camera: use a tripod or fixed support. Handheld shake hurts event timing and angle tracking.
  • 5. Bright lighting and clean background: the athlete should separate clearly from the background in every frame.
  • 6. Start from a true set: begin recording once the athlete is motionless in the standing 2-point posture, then execute one clear rep.

Keep the same lane, camera height, and stance side across sessions. If the filming setup changes, trend comparisons become much less useful.

2-point distance start report card with metrics and coaching cues

Part 2: What The Results Mean

Read the report in layers instead of chasing every number at once.

The report card works best as a sorting tool. Keep green metrics stable, note yellow metrics that support a larger pattern, and coach the red metrics that line up around the same phase of the start.

Key Moments

Set | First Move | Takeoff | First Contact

These timestamps anchor the whole clip. If a phase looks late or messy, the cards in that phase tell you why.

What The Start Score Means

Use it as a summary, not the cue

The Distance Start Score summarizes setup, push timing, takeoff projection, and first-step efficiency. Use it to confirm progress, but coach from the actual metric cards.

Good / Okay / Fix

GOOD keep it | OKAY monitor it | FIX coach it

Green means preserve it. Yellow means usable but not yet clean. Red is where the biggest gains usually live and where the first cueing should go.

How To Extract Actionable Info

Pair setup + push + first step

Look for clusters: set posture metrics together, onset and leg-sync together, projection with torso lean and COM rise together, then first-step distance with first-contact time.

Primary Launch Metrics

Projection | Front Load | Leg Sync | Step Distance | Takeoff Torso

These are the fastest read on whether the athlete is projecting out of the start or leaking force upward and late.

When To Retest

After a focused technical block

Do not retest after random reps. Make one or two changes, get a few clean starts, then compare the next report card to confirm the pattern moved.

Set Position And Initiation

Fix the launch shape first, then judge the first step.

If the athlete is set poorly or hesitates into the push, the later takeoff and first-contact metrics will usually show the damage. Start here when several cards are red at once.

Front Leg Load Angle (Set)

Good: 40-50° Okay: 35-55° Fix: <35° or >55°

Forward shin load angle of the front leg in the set posture.

Cue: Set the front shin where you want to go so the first push projects out, not up.

Torso Lean Angle (Set)

Good: 30-42° Okay: 25-48° Fix: <25° or >48°

Forward torso lean in the crouched set position before takeoff.

Cue: Roll forward onto the balls of the feet with the nose over the toes before the gun.

Movement Onset Time

Good: ≤0.18 s Okay: 0.181-0.240 s Fix: >0.240 s

Time from stable set posture to the first committed launch movement.

Cue: Avoid any false step. Push immediately off both legs when the gun goes.

Double-Leg Extension Sync

Good: ≤0.040 s Okay: 0.041-0.065 s Fix: >0.065 s

Timing gap between front- and rear-leg peak extension during the launch push.

Cue: Explode forward off both legs together instead of letting one leg leak force early.

Arm Drive Symmetry

Good: ≤18° error Okay: 19-30° error Fix: >30° error

Average deviation from a compact front-arm punch and full back-arm drive at takeoff.

Cue: Punch one arm forward while the other drives long behind you to organize the push.

Head Lift Angle

Good: ≤25° Okay: 26-35° Fix: >35°

Shoulder-to-nose angle used as a neutral-head proxy at takeoff.

Cue: Keep the chin quiet and the eyes slightly down the runway so the hips do not pop up early.

If several red cards show up here, rebuild the set posture first, then retest onset and synchronization. Early mechanics usually clean up later metrics faster than the other way around.

2-point start report card focused on setup and initiation metrics
2-point start report card focused on takeoff and first-step metrics

Takeoff, First Step, And Trend

Use the takeoff and first-contact cards to see whether force stayed horizontal.

These cards answer the practical coaching question: did the athlete push out cleanly, or did the start rise early and lose distance into the first contact?

Projection Angle (COM Takeoff)

Good: 38-45° Okay: 34-48° Fix: <34° or >48°

Center-of-mass travel angle from hip-midpoint motion at takeoff.

Cue: Push out, not up. Let the chest lead the motion like you are falling into the run.

Torso Lean Angle (Takeoff)

Good: 35-45° Okay: 30-50° Fix: <30° or >50°

Forward torso angle when the athlete leaves the loaded start position.

Cue: Keep the chest leading forward at takeoff so the force stays horizontal.

Rear Leg Extension

Good: ≥170° Okay: 160-169° Fix: <160°

Rear-leg extension angle during the launch drive phase.

Cue: Finish the push behind you before that rear leg cycles through.

First Step Distance

Good: 0.90-1.30 x leg Okay: 0.80-1.45 x leg Fix: <0.80 or >1.45 x leg

Rear-foot travel distance from set to first ground strike, normalized by leg length.

Cue: Win the first step by covering ground instead of churning in place.

First Step Ground Contact

Good: 0.12-0.18 s Okay: 0.10-0.22 s Fix: <0.10 or >0.22 s

Estimated time the first step stays on the ground before toe-off.

Cue: Strike and go. Make the first contact short and forceful instead of sticky.

COM Vertical Oscillation

Good: ≤0.08 body Okay: 0.09-0.12 body Fix: >0.12 body

Hip-midpoint rise after takeoff used as an early projection efficiency proxy.

Cue: Stay low and keep driving forward so the hips do not bounce upward in the first step.

Projection angle, takeoff torso lean, and COM rise should usually tell the same story. If all three are red, the athlete is probably popping up instead of driving out.

Coaching Priorities

Turn the report into the next training block.

The fastest way to use this report is to match the data to the phase that broke down, then give the athlete one simple cue at a time. Keep the drill block narrow and retest after a few clean reps.

Coach's rule: keep what is green, address the biggest red cluster, and verify the change with another clip. One cue per rep block is usually enough.

2-point start coaching priorities from the report card