AI Pushup Form Analysis

The Single-Rep Pushup Form Analysis app in /pushup turns one side-view rep into a score, phase snapshots, and coaching priorities for depth, lockout, plank line, stability, and timing.

AlphaPeak logo

Film one clean side-view pushup from top plank to top finish, then use the report to coach the first thing that breaks.

Best results come from a stable camera near hip height, bright light, the full body visible, and one complete rep per clip. Choose the correct pushup type before analyzing so the app scores the right standard.

Side view Full body visible Camera near hip height Top plank start + finish 30 fps or higher
Recording setup for single-rep pushup analysis

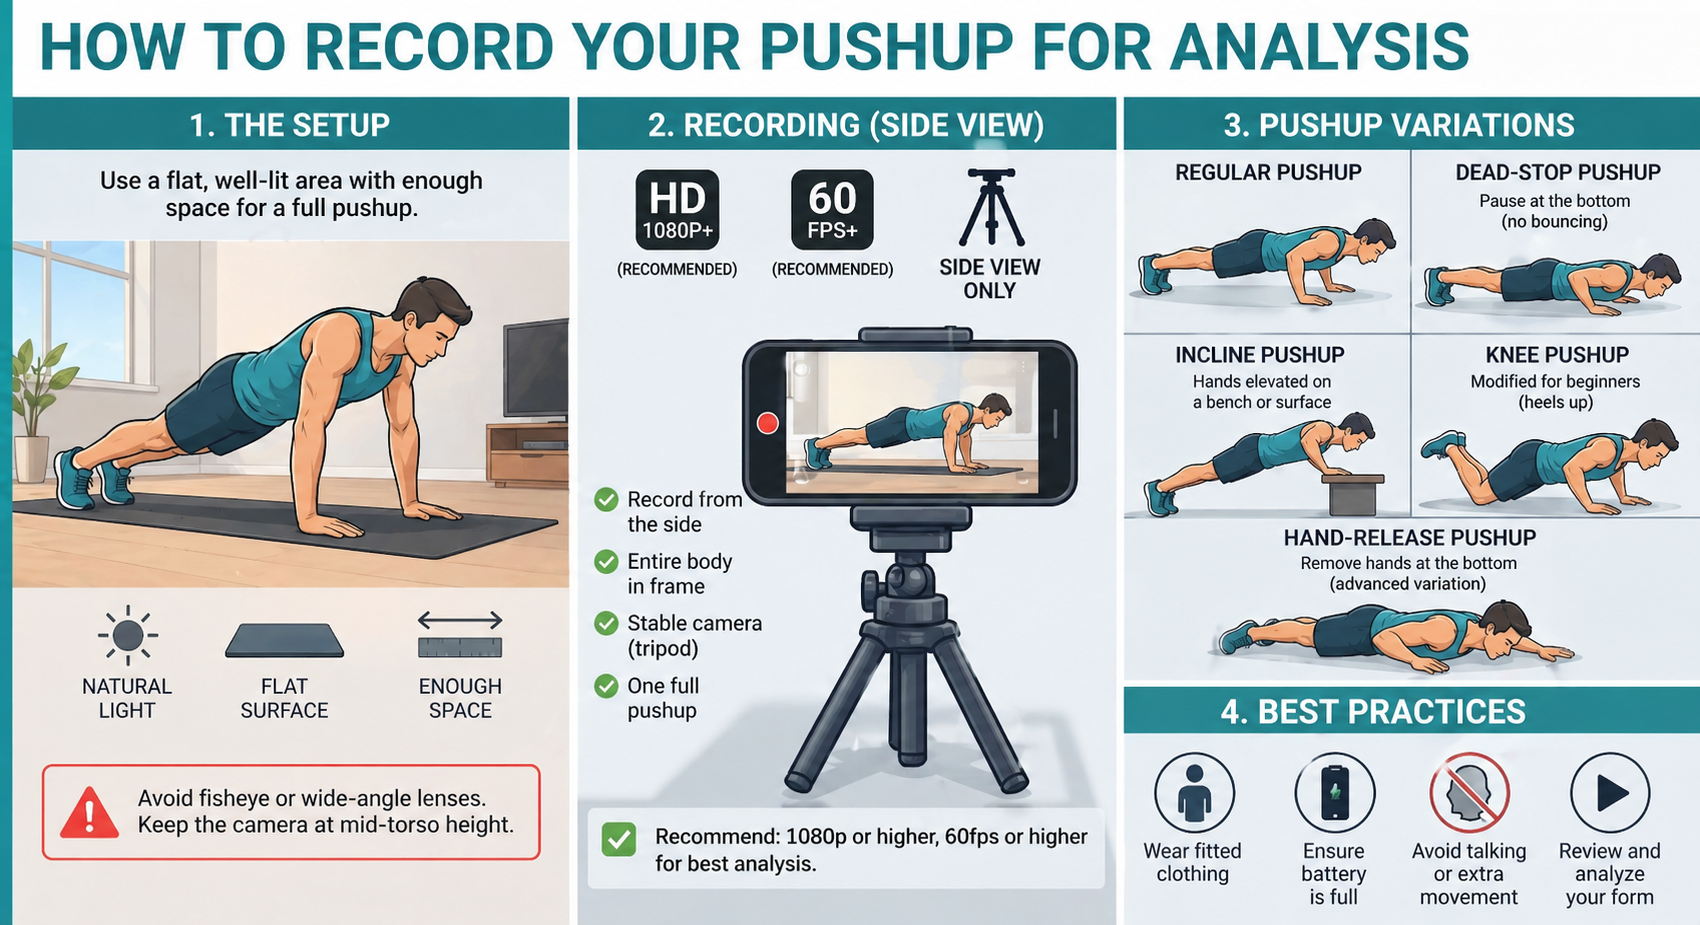
Part 1: Record The Rep

Clean side-view footage makes the depth, elbow, and plank-line reads usable.

  • Record one full pushup per clip. Start in a strong top plank, lower under control, press up, and finish with arms extended.
  • Use a true side view. The app needs to see the shoulder, elbow, wrist, hip, knee, and ankle on the working side.
  • Keep the full body in frame. Do not crop the head, hands, feet, or hips at any point in the rep.
  • Place the camera near hip height. A low, stable side angle keeps shoulder depth and hip-sag measurements cleaner.
  • Use bright, even light. Avoid shadows, busy backgrounds, or loose clothing that hides the body line.

A clean clip matters more than a hard rep. If the athlete shifts out of frame or the camera moves, retest before trusting the score.

Part 2: Use The App

Upload one video, select the right standard, and review the phase snapshots before the final score.

  • Choose Basic or Advanced. Basic is faster for simple field checks; Advanced gives the app more pose detail when video quality is good.
  • Select the pushup type. The app can score the rep against the chosen pushup standard instead of treating every clip the same.
  • Upload one side-view clip. The app detects the rep and builds phase frames for top start, descent, bottom, ascent, and top finish.
  • Use Results for the PDF. The report includes the score, strengths, improvements, key metrics, and annotated snapshots.

If the bottom frame looks early or late, fix the video setup first. A better side view usually improves the coaching notes more than changing any setting inside the app.

Pushup app upload controls and analysis settings
Pushup analysis report with metrics and coaching feedback

Part 3: Main Metrics

Read the report from range of motion first, then check whether the body stayed connected.

The score is a summary. The most useful coaching information is in the metric cards and the phase snapshots that show where the rep changed.

Elbow Angle

Top + Bottom

Confirms full extension at the top and enough bend at the bottom for the selected pushup standard.

Shoulder Depth

Bottom Frame

Checks whether the shoulder dropped low enough relative to the elbow, hand, and body line.

Body Line / Plank

Hip Sag

Flags hips dropping, piking, or losing the straight shoulder-to-ankle line through the rep.

Timing + Stability

Smoothness

Looks for a controlled descent, clean bottom transition, steady press, and minimal body shift.

Good Watch Fix

Part 4: Coach By Phase

Use the five snapshots to find the earliest problem, then retest one correction at a time.

Top Start

Begin tall through the crown of the head, ribs down, hips level, and elbows extended.

Descent Start

Lower as one connected line. The hips should not drop before the chest moves.

Bottom

Reach the target depth while keeping the neck quiet, shoulders organized, and trunk braced.

Ascent Start

Press from the floor without snaking up, flaring early, or leaving the hips behind.

Top Finish

Return to full extension and hold a stable plank before ending the clip.